This is rather basic, but I see lots of questions about it.
Out-of-the-box, the Catalog Full Display page will show 100 Items records in the Item Information section. To change this value, use the MaxItems= parameter on the CatalogFull (and/or OpacFull) report in MyReports.config. For example:
<!-- CatalogFullReport -->
<inmg:Report Name="CatalogFull" ShowItemInfo="true" ShowBorrowerInfo="true" ShowReserves="true" ShowEditReserveLink="true" ShowEditItemLink="true" MaxItems="10">
<Field Name="CatTitle" Header="<b>" Footer="</b>" Separator="<br>"/>
<Field Name="CatSubtitle" Separator="<br>"/>
...
Note: Remember to click Reset on the About Genie window after making this change.
Thursday, December 11, 2008
Thursday, November 20, 2008
Genie: Specifying the sort in the Item Information, etc. sections
In the Catalog and OPAC full reports, the method for specifying the sort order in the <Item Information>, <Serial Information>, etc. sections is different than specifying sort order elsewhere. Instead of putting Reverse="true" on the <Field> tag, you use a minus sign (-) before the field name in the SortBy= line, as shown in the example below, which sorts by ItemLocation, then subsorts by ItemIssue in descending order.
<!-- Sample configuration for Item, Loan, Reserve, and serial information -->
<ItemInfo Heading="Item Information" ShowItemNumber="true" SortBy="ItemLocation|-ItemIssue" >
<Field Name="ItemLocation" Footer=": "/>
<Field Name="ItemIssue" Header="[" Footer="], " />
<Field Name="ItemCopyInfo" Footer=", "/>
<Field Name="ItemBarCode"/>
<Field Name="ItemSubLocation" Header=", "/>
<Field Name="ItemShelf" Header=", " Footer=" " NoContentHeader=" "/>
<Field Name="ToCFileName.ItemToCID" Header="" Footer=" " NoContentHeader=" " TreatAs="ToCIcon"/>
</ItemInfo>
<LoanInfo>
<Field Name="BorrName.LoanBorrID" Header=" - on loan to " Footer=", " NoContentHeader=" - on loan, "/>
<Field Name="LoanDateDue" Header="due " NoContentHeader="permanent loan"/>
</LoanInfo>
<ReserveInfo Heading="Reserves" ShowItemNumber="true">
<Field Name="ResDateRequested" Footer=", "/>
<Field Name="BorrName.ResBorrID" Header="by "/>
<Field Name="ResLocation" Header=", at location "/>
<Field Name="ResItemBC" Header=", for item "/>
</ReserveInfo>
<SerialInfo Heading="Serials" ShowItemNumber="true">
<Field Name="SerDatesRecd" UseFunction="FirstEntry" Header="Latest issue received: " Footer=". "
NoContentHeader="No issues received. "/>
</SerialInfo>
<!-- -->
Thursday, October 16, 2008
DB/TextWorks: simple Form Script to populate field with user name
The script below puts the user's Windows login name in a specific form box when the user creates a New Record using the edit form containing the script.
function onRecordNew()
{
var WSHNetwork = new ActiveXObject("WScript.Network");
var szLoginName = WSHNetwork.UserName;
Form.boxes("boxEnteredBy").content = szLoginName;
}
The only other step is to ensure that you call the box you want populated with the user's login name "boxEnteredBy" on the Names tab of the Form Script dialog box.
This script requires that Windows Script Host be installed on the user's machine.
You can also have a substitution list on the field that transforms the login name to a prettier form of the name.
E.g., a subtitution list entry might look like:
lweiss:Lisa Weiss
Thursday, October 2, 2008
WebPublisher PRO: New Search shows query criteria
Question: If I click the New Search button on the search results page, when I return to the query screen, my previous query criteria still appear. How do I eliminate this behavior so the query boxes are empty when I click New Search?
Answer: Edit the HTML query screen and remove the following line:
<input id="QS" type="hidden" value="query screen name" name="QS">
Answer: Edit the HTML query screen and remove the following line:
<input id="QS" type="hidden" value="query screen name" name="QS">
Thursday, August 28, 2008
Genie: Permitting the Order Date to be edited on the Edit Order page
Out-of-the-box, the Order Date box on the Edit Order page is read-only.
If you would like to permit users to edit the Order Date, to change it to another date, edit MyEditScreens.config, and change this line:
<Field Name="OrdDateOrdered" Type="TextBox" CssClass="orders_edit_onethird_readonly" ShowBrowse="false" Required="false" Width="232" Align="left" ReadOnly="true"/>
To say this:
<Field Name="OrdDateOrdered" Type="TextBox" CssClass="orders_edit_onethird_textinput" ShowBrowse="false" Required="false" Width="232" Align="left" />
The changes were to remove ReadOnly="true" and change the CssClass=.
Remember to change the line in both the orders_item_edit and orders_serial_edit screens.
Thursday, August 14, 2008
WebPublisher PRO: XML queries using saved sets
Occasionally you may want to submit an XML query that uses a set saved in the textbase.
The following will search for a saved set. The <QY> is just the standard Command Query syntax to find a saved set. Note that it does not refresh the set; the records are the records that were in the set the last time it was saved. This is essentially like using Load Set in TextWorks.
<?xml version="1.0" ?>
<Query xmlns="http://www.inmagic.com/webpublisher/query" detail="qy">
<AC>QUERY</AC>
<QY>find {automation}</QY>
<XM>1</XM>
<TN>CARS</TN>
</Query>
If you want to refresh the set so that the search will retrieve the records added since the set was last saved, use a Menu Query, like so:
<?xml version="1.0" ?>
<Query xmlns="http://www.inmagic.com/webpublisher/query" detail="qy">
<AC>menu_query</AC>
<SN>automation</SN>
<XM>1</XM>
<TN>cars</TN>
</Query>
Thursday, August 7, 2008
Genie: adding red Reserves asterisk to other Loans reports
The Loans Renewal report shows a red asterisk next to titles that have one or more active Reserves.
You can apply this feature to other Loans reports, as well.
To do so, edit MyReports.config and add the following line where you want the red asterisk to appear in the report.
<Field UseFunction="IsActiveReserve" Style="Color:Red"/>
The IsActiveReserve function requires that the report also include the LoanItemBC and LoanCatID fields. If these fields are not already included in the report, and you do not want them to appear in the report, use the Visible="false" setting to hide them.
<Field Name="LoanItemBC" Visible="false"/>
<Field Name="LoanCatID" Visible="false"/>
Note: Including IsActiveReserve can slow down the speed of report display since determining whether to display the red asterisk requires searching Reserves for each record in the report.
Thursday, July 31, 2008
Genie: GlobalResource.RESX post amended
I have amended the text of the following post based on information from Jean Billingham at Inmagic, Inc. that Genie automatically uses the GlobalResource.en-US.RESX file if it is present. Thanks, Jean!
Genie: changing the text of messages not configurable elsewhere
Thursday, July 24, 2008
Genie: Adding fields to the Edit Catalog Record page so they appear regardless of which tab is selected
The Edit Catalog Record page has tabs, each of which shows a different subset of fields. Sometimes it's helpful to have fields that are always visible, regardless of which tab is selected, as in the screenshot below.
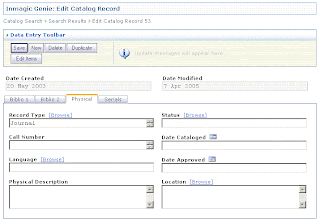

To do this, you add the fields above the first <SubSection> tag. For example:
<!-- ========CATALOG Edit Screen======== -->
<inmg:EditScreen Name="catalog_edit" TitleForAdd="Add New Catalog Record" TitleForEdit="Edit Catalog Record" TitleCss="tblheader">
<Toolbar Title="Data Entry Toolbar">
<Button Name="Add" Text="Add Record"/>
<Button Name="Save" Text="Save"/>
<Button Name="New" Text="New"/>
<Button Name="Delete" Text="Delete"/>
<Button Name="Duplicate" Text="Duplicate"/>
<Button Name="EditItem" Text="Edit Items" NewRow="true"/>
<!--<Button Name="GenerateItems" Text="Generate Items"/>-->
</Toolbar>
<EditSection SectionType="TabStrip">
<Field Style= "font-weight: bold" CellSpacing="0" CellPadding="6" Width="100%" Align="center">%%StartTable</Field>
<Field>%%StartRow</Field>
<Field Width="50%" Name="CatDateCreated" Type="TextBox" CssClass="catalog_readonly" NumLines="1"/>
<Field Width="50%" Name="CatDateModified" Type="TextBox" CssClass="catalog_readonly" NumLines="1"/>
<Field>%%EndRow</Field>
<Field>%%EndTable</Field>
<SubSection Name="Biblio1" Title="Biblio 1">
...
With the code above, the added boxes line up with the boxes on the tabs at the minimum supported screen resolution for Genie (1024x768). However, if you use a higher screen resolution, the two added boxes start creeping towards the right.
To address this, remove the following:
- Width="100%" in the %%StartTable line
- Align="center" in the %%StartTable line
- Width="50%" in the line for each textbase field
Then add to the Style= as shown below.
<EditSection SectionType="TabStrip">
<Field Style="width:700px;align:left;font-weight: bold" CellSpacing="0" CellPadding="6">%%StartTable</Field>
<Field>%%StartRow</Field>
<Field Name="CatDateCreated" Type="TextBox" CssClass="catalog_readonly" NumLines="1"/>
<Field Name="CatDateModified" Type="TextBox" CssClass="catalog_readonly" NumLines="1"/>
<Field>%%EndRow</Field>
<Field>%%EndTable</Field>
<SubSection Name="Biblio1" Title="Biblio 1">
Thursday, July 17, 2008
Genie: Using hanging indentation for TipContent in MyEditScreens.config
The How To tips on the Loans Check Items In and Check Items Out pages use numbered steps. Changing the steps to use hanging indentation is as simple as using an HTML ordered list (<ol>). However, by default an ordered list has inherent indentation that causes the tips to wrap more than necessary.
I used a style= in my <ol> tag to specify a margin-left value with less indentation. See the screenshot and sample MyEditScreens.config snippet below.

<EditTips ShowIcon="true" Title="How To Check Out" ImageURL="Images/xp_bulb.gif"
TipContent="<ol style="margin-left:25px;"><li><p>Enter the borrower name or number.</li><br><br>
<li>Type or scan item bar codes into the Items box, each on a separate line. </li><br><br>
<li>Select a loan term from the Term of Loan drop-down list.</li><br><br>
<li>Click the <b>Check Out</b> button.</li></ol>"/>
Note: I used two <br> instead of <p>stuff</p> because it resulted in less vertical space between steps, and was easier than tracking down the line-spacing style for the <p> tag.
Thursday, June 26, 2008
Genie: Adding a Create New Supplier link to the Edit Serial Record screen
You can add a link to the Edit Serial Record screen to create a new Supplier if the one you want to specify does not appear in the drop-down list.
Edit MyEditScreens.config, locate the serials_edit screen, and change the SerSuppID line to look something like the following.
<Field Name="SerSuppID" Type="DropDownList" CssClass="serials_edit_textinput" Width="50%" Display="Supplier <a href="/inmagicgenie/supplier_edit.aspx" target="_blank" style="font-weight: normal" >[Create New Supplier]</a>"></Field>
Note that the spaces after "Supplier" shown above are non-breaking spaces (Alt+0160). Multiple normal spaces are displayed as a single space in HTML output.
After creating the new supplier, users have to manually close the pop-up browser window, then use the browser's Refresh button to refresh the main page so the new Supplier is added to the drop-down list. They must Save before clicking the [Create New Supplier] link or before using Refresh. Otherwise, any other changes they've made to other fields on the page will be lost.
Similar changes could be made to add a Create New Supplier link to the Edit Order or Set Up Serial Arrival Pattern screens.
Tuesday, June 24, 2008
Genie: changing the font for Search Tips
To change the font for the text in the Search Tips box on Genie Search Screens, create a MyGenie.CSS file in the same folder as the Genie.CSS file, and copy the following two styles into it.
.sidemenutxt {font-family: Verdana, Arial, Tahoma; font-size: 8pt; font-weight: Normal; color: #686868; line-height:14px;}
.sidemenuhead2 {font-family: Verdana, Arial, Tahoma; font-size: 8pt; font-weight: Bold; color: #8a8a8a; line-height:14px;}
The first style affects the "Search Tips" text, the second the rest of the paragraphs in the box.
Modify the font-family, etc., in each style as desired.
Note: Depending on the changes you make, you may also want either to modify MyQueries.config to add a <SearchTips> tag to hide the Help link (ShowHelpLink="false"), or also copy the following style to MyGenie.css, and change the font family and size to match what you set for "sidemenutxt". The "a:link" style is more generally used, and will affect other links, e.g., About Genie on the menu.
a:link {font-family: Verdana, Arial, Tahoma; font-size: 8pt; color: #0066CC;}
Thursday, June 19, 2008
TextWorks 9.0 and older: Maintain Thesaurus displays "Unable to access the thesaurus"
For DB/TextWorks and CS/TextWorks 9.0 and earlier...
On systems where Internet Explorer 7.0 has been installed, choosing Maintain>Maintain Thesaurus from the Textworks menu will display:
Unable to access the thesaurus.
The recommended fix for this issue is to upgrade to TextWorks 10.0 or later, then run Setup Workstation from each workstation that has IE 7.0 installed. This process will create the necessary registry key on the workstation, so this message doesn't appear, and Maintain Thesaurus works properly.
If upgrading is impractical for some reason, the following registry key needs to be created manually. (Replace dbtext32.exe with inmcsrv.exe for Content Server systems.)
HKEY_LOCAL_MACHINE
SOFTWARE
Microsoft
Internet Explorer
Main
FeatureControl
FEATURE_OBJECT_CACHING
DBText32.exe=0x00000000
Friday, June 13, 2008
Genie: making the "Check for reserves" link more obvious
On the Check Items In page in Genie, you can make the link to check reserves more obvious, if you like. For example, to change the link color to be red, instead of the default blue, you can modify the loans_checkin screen in MyEditScreens.config, to change this:
<Field Display="Check for reserves against item(s) checked in." Style="font-weight: normal">%%CheckForReserve</Field>
To this:
<Field Display="Check for reserves against item(s) checked in." Style="color: red;font-weight: normal">%%CheckForReserve</Field>
<Field Display="Check for reserves against item(s) checked in." Style="font-weight: normal">%%CheckForReserve</Field>
To this:
<Field Display="Check for reserves against item(s) checked in." Style="color: red;font-weight: normal">%%CheckForReserve</Field>
Wednesday, June 11, 2008
Genie: Advanced vs. Simple search screens in OPAC
Another example of using the Heading= option:
Some sites would prefer not to have a drop-down list of search screens on their OPAC search screen. Instead they want a link to their advanced search screen.
To do this, modify MyQueries.config as follows:
To remove the drop-down list showing the search screens, edit the following section to comment out the opac_search screen, as shown below
<!-- ** Note: Use special TextbaseName="Opac" to specify the screens listed in the opac.aspx -->
<inmg:QueryScreens TextbaseName="Opac">
<inmg:QueryScreen Name="simple_opac_search"></inmg:QueryScreen>
<!-- <inmg:QueryScreen Name="opac_search"></inmg:QueryScreen> -->
</inmg:QueryScreens>To add the link to the advanced search screen, add the Heading= parameter to the first line of the simple_opac_search screen as follows.
<inmg:QueryScreen Name="simple_opac_search" Title="Simple Catalog Search" BrowseButtonText=" Browse " BooleanAnd="AND" BooleanOr="OR" BooleanNot="NOT" Heading="Catalog<p><a href="/InmagicGenie/opac.aspx?QueryScreen=opac_search">Advanced Search</a>">Make the corresponding change to the opac_search screen to add a link back to the simple search screen.
Genie: adding Reserves to the Loans section of the Genie menu
Here's another use for Genie canned queries. You can add a search for the active Reserves to the Loans section of the Genie menu.
For example, in MyNavbarMenuData.config, add the following <Item> tag immediately below the <Item> tag for Loan_Renewal.
<Item Id="Loan_Reserves" Look-LeftIconUrl="your-picture-here.gif" Text="Find Reserves" NavigateURL="reserves_report.aspx?AC=QBE_QUERY&QY=find+ResStatus%3dactive&Type=Statistics&TextbaseName=Reserves"
permission="Administrators Catalogers Staff"></Item>
Note that since .CONFIG files are XML files, the ampersands (&) must be encoded (&). And the equal sign (=) is also encoded (%3d).
Tuesday, June 10, 2008
Genie: changing the text of messages not configurable elsewhere
Note: This article was amended on July 31, 2008, to reflect the fact that the GlobalResource.en-US.RESX file is used automatically.
In Genie, if you want to change the text of a message or other text string that is not configurable elsewhere (one of the .CONFIG files), follow the procedure below.
Important! Do not modify the original GlobalResource.RESX file. This file is likely to be replaced during upgrade and service pack installs.
Create a new empty file in the same folder as GlobalResource.RESX (App_GlobalResources) that uses the name GlobalResource.en-US.RESX.
- Copy from the GlobalResource.RESX file to the new .RESX file:
- The header information: Everything from the top of the file to just before the first <data> tag.
- Only those <data> tags containing messages that you want to be different than the original message.
- The </root> tag from the bottom of the file.
Genie will use this new GlobalResource.en-US.RESX file automatically once it exists.
If you have multiple groups of users who need different sets of messages (for example, if you have a multi-lingual site), follow these steps.
- Create multiple .RESX files following the steps above, each with a different locale name (the string before .RESX in the file name). The locale name specified doesn't matter, except that it must be a real locale. The locale you specify in the .RESX file name will not have any other impact on Genie.
- When creating the URLs for these groups to use include the Language= parameter. For example:
http://domain-name/inmagicgenie/catalog.search.aspx?Language=fr-CA
http://domain-name/inmagicgenie/opac.aspx?Language=fr-CA
Note: Specifying the Language= in the URL will suppress the language drop-down list on the Catalog Search page by default.
Thursday, June 5, 2008
Genie: adding A-Z links at the top of a Search Screen
Further to my previous post about Genie canned queries...
You can use the Heading= parameter in MyQueries.config to add canned queries for specific searches at the top of a Genie search screen.
For example, the Heading= parameter in the code below will add links like the following to the top of the Simple Catalog Search page. (Links for the rest of the alphabet are an exercise for the user.)
Inmagic Genie: Catalog
Title starts with: A B C D E F-G
<inmg:queryscreen name="simple_catalog_search" Heading="Catalog<p><b>Title starts
with:</b> <a
href="/InmagicGenie/catalog_report.aspx?AC=QBE_QUERY&QY=find+CatTitle=a*&TN=catalog&ReportName=CatalogBrief">A</a> <a
href="/InmagicGenie/catalog_report.aspx?AC=QBE_QUERY&QY=find+CatTitle=b*&TN=catalog&ReportName=CatalogBrief">B</a> <a
href="/InmagicGenie/catalog_report.aspx?AC=QBE_QUERY&QY=find+CatTitle=c*&TN=catalog&ReportName=CatalogBrief">C</a> <a
href="/InmagicGenie/catalog_report.aspx?AC=QBE_QUERY&QY=find+CatTitle=d*&TN=catalog&ReportName=CatalogBrief">D</a> <a
href="/InmagicGenie/catalog_report.aspx?AC=QBE_QUERY&QY=find+CatTitle=e*&TN=catalog&ReportName=CatalogBrief">E</a> <a
href="/InmagicGenie/catalog_report.aspx?AC=QBE_QUERY&QY=find+CatTitle=f:gz&TN=catalog&ReportName=CatalogBrief">F-G</a>" Title="Simple Catalog Search" BrowseButtonText=" Browse "
BooleanAnd="AND" BooleanOr="OR" BooleanNot="NOT">
Friday, May 30, 2008
Genie Canned Queries
Some users would like to have a canned query which performs a specific search in Genie.
OPAC example:
/InmagicGenie/opac_report.aspx?AC=QBE_QUERY&QY=find+CatTitle+CT+Computers&TN=catalog&ReportName=OpacBrief&Type=Opac
Catalog Search example (requires login):
/InmagicGenie/catalog_report.aspx?AC=QBE_QUERY&QY=find+CatTitle+CT+Computers&TN=catalog&ReportName=CatalogBrief
The ReportName is the report in MyReports.config.
AC= and TN= are the same as for WPP canned queries.
The QY= uses the CS/TextWorks Command Query syntax.
Subscribe to:
Posts (Atom)