The Edit Catalog Record page has tabs, each of which shows a different subset of fields. Sometimes it's helpful to have fields that are always visible, regardless of which tab is selected, as in the screenshot below. 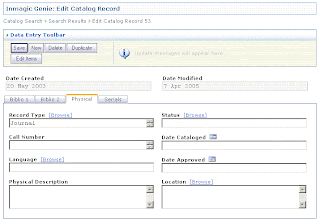
To do this, you add the fields above the first <SubSection> tag. For example:
<!-- ========CATALOG Edit Screen======== -->
<inmg:EditScreen Name="catalog_edit" TitleForAdd="Add New Catalog Record" TitleForEdit="Edit Catalog Record" TitleCss="tblheader">
<Toolbar Title="Data Entry Toolbar">
<Button Name="Add" Text="Add Record"/>
<Button Name="Save" Text="Save"/>
<Button Name="New" Text="New"/>
<Button Name="Delete" Text="Delete"/>
<Button Name="Duplicate" Text="Duplicate"/>
<Button Name="EditItem" Text="Edit Items" NewRow="true"/>
<!--<Button Name="GenerateItems" Text="Generate Items"/>-->
</Toolbar>
<EditSection SectionType="TabStrip">
<Field Style= "font-weight: bold" CellSpacing="0" CellPadding="6" Width="100%" Align="center">%%StartTable</Field>
<Field>%%StartRow</Field>
<Field Width="50%" Name="CatDateCreated" Type="TextBox" CssClass="catalog_readonly" NumLines="1"/>
<Field Width="50%" Name="CatDateModified" Type="TextBox" CssClass="catalog_readonly" NumLines="1"/>
<Field>%%EndRow</Field>
<Field>%%EndTable</Field>
<SubSection Name="Biblio1" Title="Biblio 1">
...
With the code above, the added boxes line up with the boxes on the tabs at the minimum supported screen resolution for Genie (1024x768). However, if you use a higher screen resolution, the two added boxes start creeping towards the right.
To address this, remove the following:
- Width="100%" in the %%StartTable line
- Align="center" in the %%StartTable line
- Width="50%" in the line for each textbase field
Then add to the Style= as shown below.
<EditSection SectionType="TabStrip">
<Field Style="width:700px;align:left;font-weight: bold" CellSpacing="0" CellPadding="6">%%StartTable</Field>
<Field>%%StartRow</Field>
<Field Name="CatDateCreated" Type="TextBox" CssClass="catalog_readonly" NumLines="1"/>
<Field Name="CatDateModified" Type="TextBox" CssClass="catalog_readonly" NumLines="1"/>
<Field>%%EndRow</Field>
<Field>%%EndTable</Field>
<SubSection Name="Biblio1" Title="Biblio 1">

